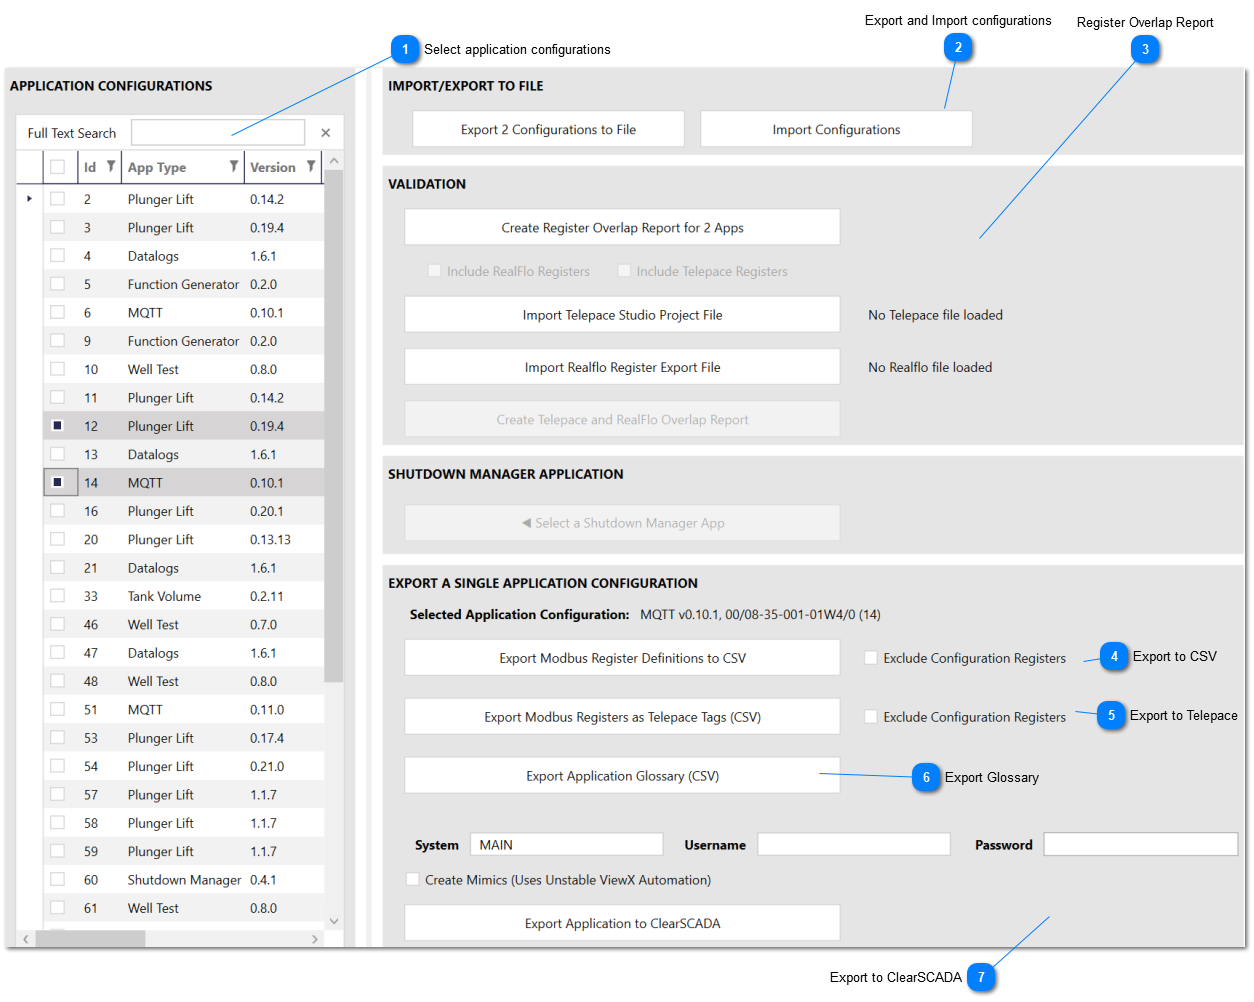
Register Overlap ReportUse this button to generate a report of the possible register overlaps across multiple applications, Schneider Electric's Realflo flow computer and a Telepace project file. This report will list all the registers that are used by all of the SCADASuite applications, and then for each register, show which tags from which applications are using that register. Any time there are more than two tags sharing a single register, register contention is possible, and unexpected operation may occur.
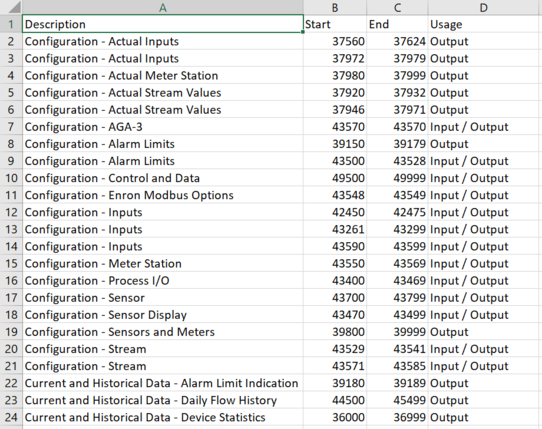
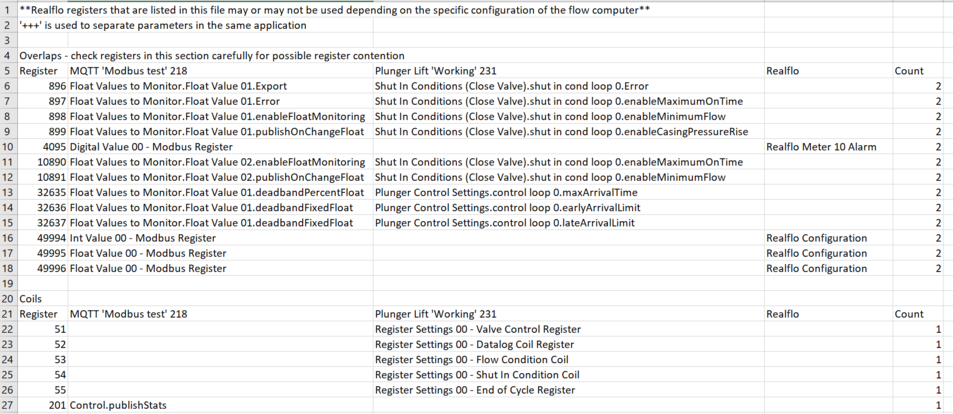
A sample register overlap report is shown below. Possible overlaps are shown at the very top of the report, followed by details for coils, contacts, inputs and holding registers. In the sample below, lines six through 18 contain possible overlaps. The Count column shows at a glance how many tags are sharing the same register. Any number other than one in the Count column indicates a possible overlap.
Because each configuration group instance has its own set of registers, it is possible for register overlap to occur within registers in the same SCADASuite application. When this occurs, tags are separated by a "+++".
|
|
Register overlaps within the same applications are indicated with a "+++" in between the register names.
|
Telepace Studio Project Files
The PC Configuration Program can also import a Telepace Studio Project file (*.tpj) for inclusion in the register overlap report. When a Telepace file is imported, the program extracts the registers that are written to from the ladder logic networks and from the input register mapping in the project file.
Only registers that are written to are extracted. For example, with a MOVE block, a set of registers is used for the source, and another set of registers is the destination. Only the destination registers are written to, and thus, only the destination registers will appear in the register overlap report.
|
|
Only registers that are written to by the Telepace program will appear in the register overlap report.
|
Similarly, for registers used by the register assignment, only contact and input registers are extracted, because these are the registers that are written to by the RTU.
The register overlap report will not find contention within the Telepace project itself. For example, if two blocks are both writing to register 42001, this will not be tagged as an internal overlap and only the first block that writes to this register will appear in the overlap report. It's quite common in ladder logic to enable or disable blocks that write to the same register depending on the execution state of the program, which means that no overlap actually occurs at runtime, which is why internal overlaps are not shown in the overlap report.
Registers in the Telepace column are prefixed with "tp" and then named according to the network in which they appear, then the block name, then the register number and then the user tag name, if it exists. For example, the register with "tpReset.MOVE.001_ResetCoil" is from a MOVE block on the Reset network and has a user defined tag name of "ResetCoil". The 001 indicates that it is the second register in the block. Registers in a block are numbered sequentially from 000.
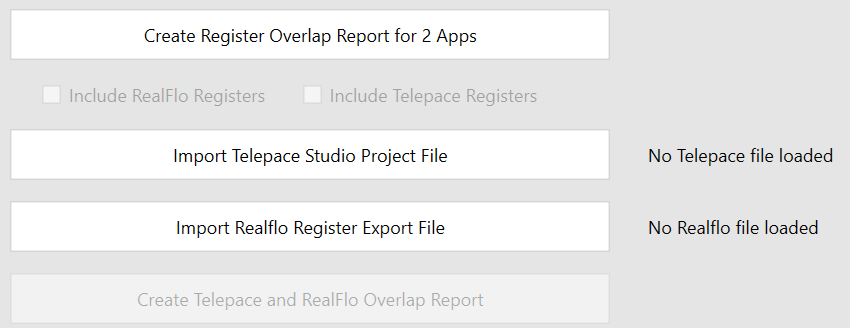
Use the Create Telepace and RealFlo Overlap Report to create an overlap report without any SCADASuite apps. This report will look for overlaps between the imported Telepace project file and RealFlo only.
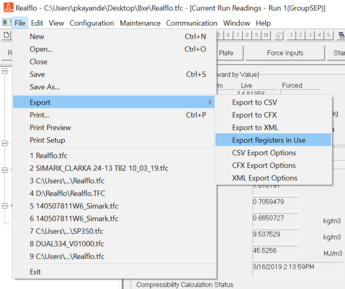
Realflo Register Export File
It is possible to export the Modbus registers used in a specific configuration through the Realflo configuration program. Use the File->Export->Export Registers in Use option to generate this file.
A file in this format can be imported using the Import Realflo Register File Export button. Once a file is successfully imported, it can be optionally be used in the register overlap report by selecting the Include Realflo Registers option.
Export Registers in Use from Realflo
Example Registers in Use File from Realflo
Register Over Report and User Configured Registers
User Configured Registers are registers that are used as a part of an application's configuration. Examples of User Configured Registers include:
-
In the Datalog application, every logged value is read from a register address that the user can configure. -
In the Plunger Lift application, the Plunger Arrival Register can be configured.
These are User Configured Registers because the user can enter any register address based on his specific needs and the configuration of his RTU.
However, for any given application, it's often not clear whether a specific user defined register is actually used by the application at run time. Additionally, each instance of a configuration parameter that holds a Modbus register address will have the same default value. Because of these two factors, the register overlap report cannot reliably detect register overlaps for User Configured Registers within the same application. Overlaps for User Configured Registers within the same application must be checked manually.
An example of this would be the Valve Control Register in the Plunger Lift application. The default value for this is 51. If only one control loop is used, then this value doesn't need to be changed, even though the other control loops still have this value configured, because the other control loops are disabled and won't touch the output register. However, if two or more control loops are enabled, then each control loop will need to use a unique Valve Control Register. The overlap report cannot detect when the register is actually used, and so it won't show any overlap within the same application. However, if another application uses register 51, then that will appear as an overlap in the register overlap report.
|
|
The register overlap report cannot reliably detect register overlaps for User Configured Registers within the same application. Overlaps for User Configured Registers within the same application must be checked manually
|
Sample Register Overlap Report
|