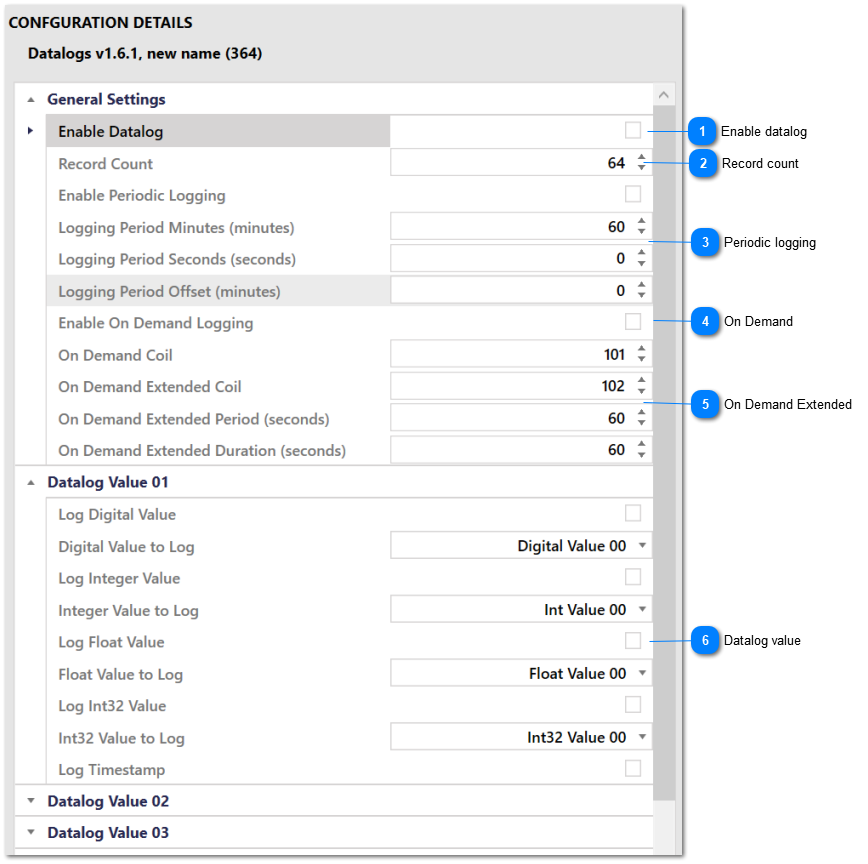
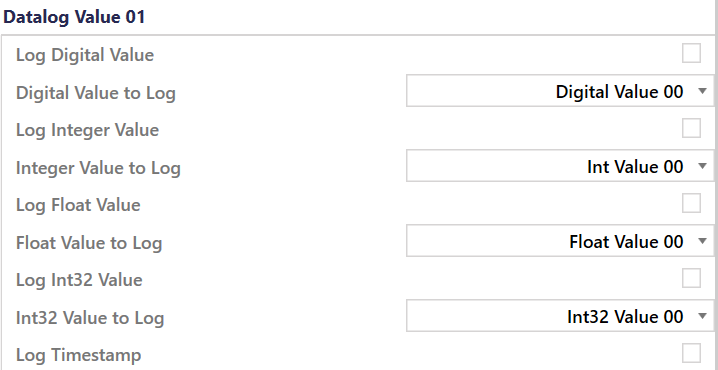
Use settings in this group enable and configure datalogs. For each datalog, it is possible to configure whether to log periodically, and if so, the logging period. It is also possible to configure which value goes in each slot in the datalog.
Changes to the configuration of a datalog (the number of logged values, the types of values or the number of records) will cause the datalog to be deleted and recreated. This will result in all data in the log being deleted.
There are 16 instances of the Datalogs settings group; one for each possible datalog on the RTU. Datalog 00 controls Datalog 1 on the RTU, Datalog 01 configures Datalog 2 on the RTU and so on.
Datalog Settings - Configuration Parameters
Enable datalog
Use this setting to enable the datalog. If a datalog is enabled, the application will try to create the log on the RTU. If a log was previously enabled, and then subsequently disabled, the application will only delete the log if it was originally created by the Datalogs application. This prevents the accidental deletion of logs created in ladder logic, or by some other means.
Use this setting to configure the number of records in the datalog.
The RTU does not have enough memory to create 16 fully sized datalogs, where each datalog has 16384 entries and holds 8 values. Configure datalogs carefully and verify that they are created correctly before putting the RTU into service.
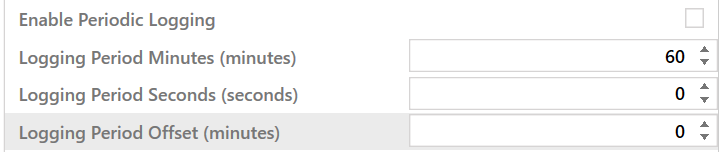
Use these settings to control periodic logging. In the application, the logging period is the sum of the value of Logging Period Minutes and Logging Period Seconds. For example, to log every 1.5 minutes (90 seconds), set the value of Logging Period Minutes to 1 and the value of Logging Period Seconds to 30.
The Logging Period Offset can be used to align the logged data to a specific minute in the hour, but since the value is in minutes, the value of the Logging Periods Seconds parameter must to 0 to use this effectively. For example, to log every 5 minutes, but at 7 minutes past the hour, 12 minutes past the hour, 17 minutes past the hour and so on, set the value of Logging Period Minutes to 5 and the value of Logging Period Offset to 7.
Use these settings to configure on demand logging. When on demand logging is enabled, data will be logged when the register in the On Demand Coil setting is set to 1. The coil will be cleared by the application once the request is processed.
Multiple datalogs can be configured to use the same register, which allows multiple datalogs to log synchronously. When configured in this manner, the timestamp in all datalogs will be identical.
Use these settings to configure extended on demand logging. The basic on demand logging features logs a single set of values when a coil is set. With extended on demand logging, setting a coil causes logging at a configurable period for a configurable duration.
Use the On Demand Extended Coil to configure which register to use to trigger on demand extended logging. Use the the On Demand Extended Period to configure the logging period when extended on demand logging is triggered. The value in this field must be a multiple of 5 seconds with no remainder (5s, 10s, 15s, etc.) Use the On Demand Extended Duration period to configure how low extended on demand logging will last once triggered.
The Enable On Demand Logging setting must be selected for extended on demand logging to be enabled. When disabled, these settings can be ignored.